
Day 4 - Creating a NuGet Package from .NET Core app
Disclaimer: I am not on the .NET Core Team. I used the tools available publicly and have no insights into the future of .NET Core. It looks very bright though. :)
The working source code for this project can be found here.
Intro
A complete list of post in this series is included below :
- Day 1 - Installing and Running .NET Core on a Windows Box
- Day 2 - Taking a Look at the Visual Studio Templates for .NET Core
- Day 3 - Running a .NET Core app on a Mac
- Day 4 - Creating a NuGet Package from .NET Core app
- Day 5 - Creating a Test Project from .NET Core
- Day 6 - Migrating an existing .NET Core to csproj
- Day 7 - Creating an ASP.NET Core Web Application
- Day 8 - Using Visual Studio Code with a .NET Core Console Application
- Day 9 - Creating a .NET Core Console App inside of Visual Studio Code
- Day 10 - Using JetBrains Rider with a .NET Core Console Application
In this post, we’re going to look at how to create a NuGet package from a .NET Core app that we have already been working with.
Switch Back to the Command Prompt
Before we begin, make sure you have the app found here if you want to follow along. After opening the app or downloading it, open the folder containing the project in the command prompt.
Run the following command :
dotnet pack
You will see the following output :
Project NetCoreConsoleApp (.NETCoreApp,Version=v1.0) will be compiled because Input items removed from last build
Compiling NetCoreConsoleApp for .NETCoreApp,Version=v1.0

Compilation succeeded.
    0 Warning(s)
    0 Error(s)

Time elapsed 00:00:02.1545012


Producing nuget package "NetCoreConsoleApp.1.0.0" for NetCoreConsoleApp
NetCoreConsoleApp -> C:\Users\mbcrump\Documents\visual studio 2015\Projects\NetCoreConsoleApp\src\NetCoreConsoleApp\bin\Debug\NetCoreConsoleApp.1.0.0.nupkg
Producing nuget package "NetCoreConsoleApp.1.0.0.symbols" for NetCoreConsoleApp
NetCoreConsoleApp -> C:\Users\mbcrump\Documents\visual studio 2015\Projects\NetCoreConsoleApp\src\NetCoreConsoleApp\bin\Debug\NetCoreConsoleApp.1.0.0.symbols.nupkg
The key thing to take away here is the following files were just created :
- NetCoreConsoleApp.1.0.0.nupkg
- NetCoreConsoleApp.1.0.0.symbols.nupkg
The first file is the NuGet package file and the second file contains the symbols. But how do we see what is inside?
Download NuGet Package Explorer
You should begin by downloading NuGet Package Explorer installer from Codeplex.
It should look like the following after installation :
Hit CTRL-O and selecting the NetCoreConsoleApp.1.0.0.nupkg file from your \bin\Debug folder.
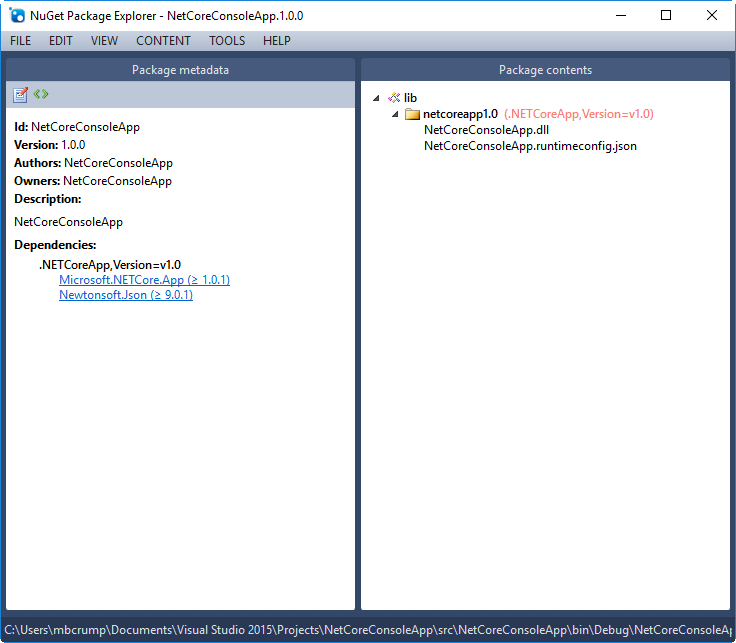
Notice that is is missing a proper author and description. If we look at the dependencies, then we can see it is dependent on .NET Core 1.0.1 and Newtonsoft.Json.
If we expand lib, then we can see our NetCoreConsoleApp.dll that we’ve examined in the previous post. Great, so this is a package that we can use, but we need some help adding in an author and description.
Correcting our Metadata
We are going to add in an author and description to our NuGet package. To begin, you may want to bookmark this page. It explains in depth how you would do this, but for now you can just follow this guide.
Head over to the project.json file in Visual Studio and under the first curly brace, hit enter and begin typing authors. It will autocomplete and you can type your name and then add a description. Your final file will look like the following :
{
  "authors": ["Michael Crump"],
  "description": "My very first NuGet package from .NET Core",
  "version": "1.0.0-*",
  "buildOptions": {
    "emitEntryPoint": true
  },

  "dependencies": {
    "Microsoft.NETCore.App": {
      "type": "platform",
      "version": "1.0.1"
    },
    "Newtonsoft.Json": "9.0.1"
  },

  "frameworks": {
    "netcoreapp1.0": {
      "imports": "dnxcore50"
    }
  }
}
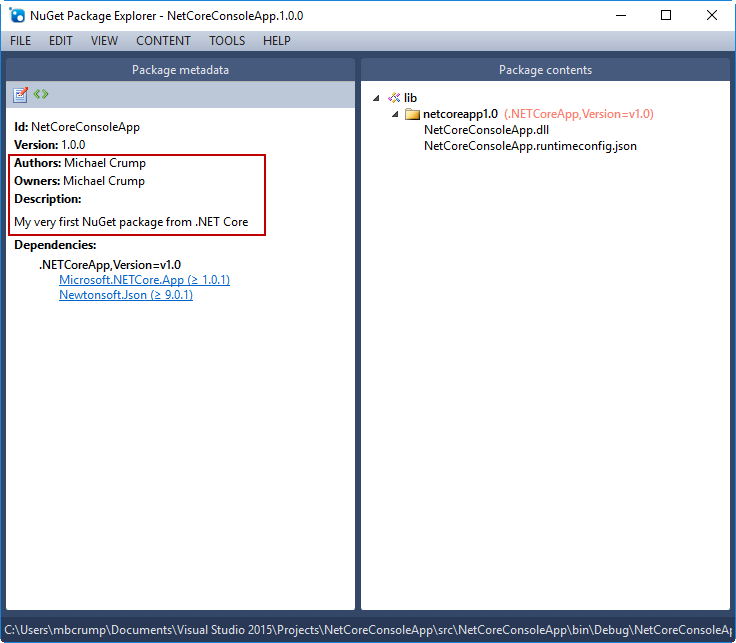
Go ahead and build your project and create another NuGet package by typing dotnet pack. Open it in NuGet Package Explorer and ta-da your NuGet package has now been updated :
Wrap-up
As always, thanks for reading and smash one of those share buttons to give this post some love if you found it helpful. Also, feel free to leave a comment below or follow me on twitter for daily links and tips.
Leave a Comment