
Azure Tips and Tricks Part 174 - Machine Learning with ML.NET and Azure Functions - Part 1 of 2
ATTENTION: Get your copy of the BEST Azure Tips and Tricks of all time in this FREE eBook now! No registration required.
The Complete List of Azure Tips and Tricks
Azure Tips and Tricks Part 174 - Machine Learning with ML.NET and Azure Functions - Part 1 of 2
Intro
Machine learning can be tricky. Fortunately, Azure is coming up with ways to make it easier for developers to jump into machine learning. ML.NET is the machine learning framework that Microsoft Research made just for .NET developers so you can do everything inside Visual Studio. If you haven’t already been playing with it, I think you’re going to love it. And when you are ready to deploy your ML.NET algorithm, you can use serverless architecture through Azure Functions— the “don’t worry about it” option when you want to get an app up and running but don’t necessarily want to mess around with servers and containers.
Serverless Machine Learning
This is part 1 of a two part post on ML.NET inspired by Luis Quintanilla’s article about using ML.NET with Azure Functions, where he took these two great ideas and combined them. You will use ML.NET locally to train your machine learning model. Then you will create an Azure environment with a storage account and Azure Function to host your machine learning app. The final step, building an app that uses your model, will be covered in the next post.
Create your model
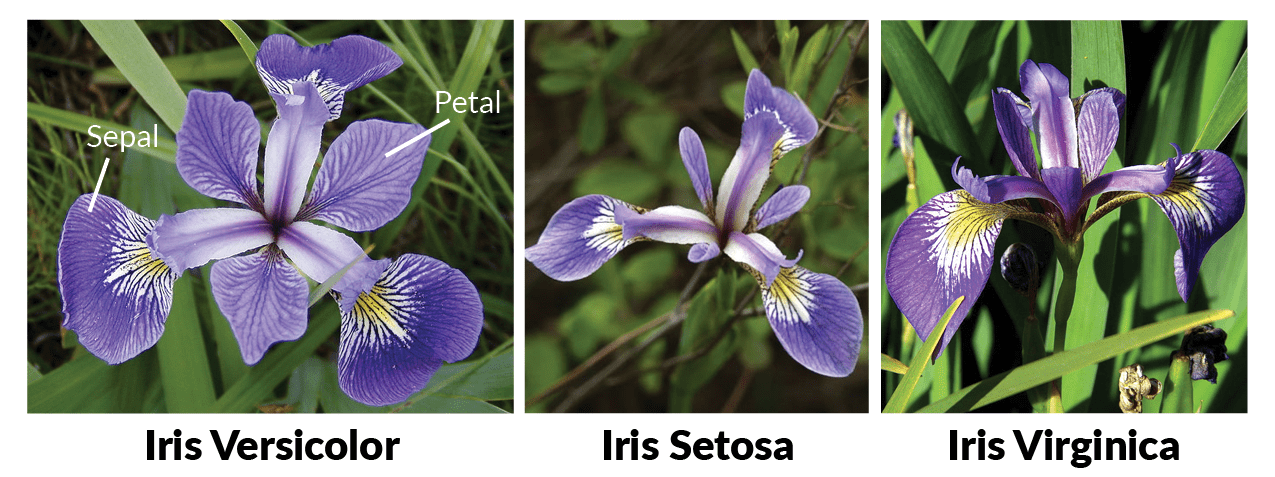
For the ML.NET portion of this quick project, let’s build the iris categorization model from the Getting started in 10 minutes ML.NET tutorial. As a prerequisite, you’ll want to install Azure CLI 2.0, Azure Functions Core Tools and a recent version of .NET Core.
Open a command prompt and create a new folder for your ML.NET project.
> mkdir demo
> cd demo
Next, create a new solution as well as a new console project and install the ML.NET package.
> dotnet new solution
> dotnet new console -o model
> dotnet sln add model/model.csproj
> cd model
> dotnet add package Microsoft.ML --version 0.4.0
> dotnet restore
Create a data directory under model.
> mkdir data
Open the UCI Machine Learning Repository: Iris Data Set, copy and paste the data into VS Code, or TextEdit or Notepad, and save it as iris-data.txt in the data directory. Now it’s time to write some code. Open up your project in Visual Studio Code and create a couple of data structure classes: IrisData.cs and IrisPrediction.cs.
using Microsoft.ML.Runtime.Api;

        public class IrisData
        {
            [Column("0")]
            public float SepalLength;

            [Column("1")]
            public float SepalWidth;

            [Column("2")]
            public float PetalLength;

            [Column("3")]
            public float PetalWidth;

            [Column("4")]
            [ColumnName("Label")]
            public string Label;
        }

        public class IrisPrediction
        {
            [ColumnName("PredictedLabel")]
            public string PredictedLabels;
        }
Add a model class to perform the machine learning training.
using System.Threading.Tasks;
using Microsoft.ML;
using Microsoft.ML.Data;
using Microsoft.ML.Trainers;
using Microsoft.ML.Transforms;

    class Model
    {
        public static async Task<PredictionModel<IrisData, IrisPrediction>> Train(LearningPipeline pipeline, string dataPath, string modelPath)
        {
            // Load Data
            pipeline.Add(new TextLoader(dataPath).CreateFrom<IrisData>(separator: ','));

            // Transform Data
            // Assign numeric values to text in the "Label" column, because
            // only numbers can be processed during model training
            pipeline.Add(new Dictionarizer("Label"));

            // Vectorize Features
            pipeline.Add(new ColumnConcatenator("Features", "SepalLength", "SepalWidth", "PetalLength", "PetalWidth"));

            // Add Learner
            pipeline.Add(new StochasticDualCoordinateAscentClassifier());

            // Convert Label back to text
            pipeline.Add(new PredictedLabelColumnOriginalValueConverter() { PredictedLabelColumn = "PredictedLabel" });

            // Train Model
            var model = pipeline.Train<IrisData, IrisPrediction>();

            // Persist Model
            await model.WriteAsync(modelPath);

            return model;
        }
    }
Place your logic inside the Program.cs file to run through the process:
    class Program
    {
        static void Main(string[] args)
        {
            string dataPath = "/Users/mbcrump/Documents/demo/model/data/iris-data.txt";

            string modelPath = "/Users/mbcrump/Documents/demo/model/model.zip";

            var model = Model.Train(new LearningPipeline(), dataPath, modelPath).Result;

            // Test data for prediction
            var prediction = model.Predict(new IrisData()
            {
                SepalLength = 3.3f,
                SepalWidth = 1.6f,
                PetalLength = 0.2f,
                PetalWidth = 5.1f
            });

            Console.WriteLine($"Predicted flower type is: {prediction.PredictedLabels}");

        }
    }
Run the model project to create a new model.zip file in your root directory. Below is the results that I got.
Michaels-MacBook-Pro:model mbcrump$ dotnet run
Automatically adding a MinMax normalization transform, use 'norm=Warn' or 'norm=No' to turn this behavior off.
Using 4 threads to train.
Automatically choosing a check frequency of 4.
Auto-tuning parameters: maxIterations = 9996.
Auto-tuning parameters: L2 = 2.668802E-05.
Auto-tuning parameters: L1Threshold (L1/L2) = 0.
Using best model from iteration 500.
Not training a calibrator because it is not needed.
Predicted flower type is: Iris-virginica
Congratulations! You’ve trained a machine learning model with ML.NET that categorizes irises.
Set up your Azure environment using Cloud Shell
We’ll use Azure Cloud Shell which uses the Azure CLI to set up our Azure environment. The easiest way to do this is to sign in to your Azure portal account and click on the cloud shell icon shown below to open a bash shell or go to shell.azure.com.

Once logged in, create a new resource group for this project in the bash shell (and replace “mlnetdemo” as well as the location with one of your own).
$ az group create --name mlnetdemo --location westus
Add storage to this resource group.
NOTE: You’ll have to change the name below to something unique
$ az storage account create --name mlnetdemostorage --location westus --resource-group mlnetdemo --sku Standard_LRS
Create your Azure Function and configure it to use the beta runtime which supports .NET Core.
NOTE: You’ll have to change the name below to something unique
` $ az functionapp create –name mlnetdemoazfunction1 –storage-account mlnetdemostorage1 –consumption-plan-location westus –resource-group mlnetdemo `
` $ az functionapp config appsettings set –name mlnetdemoazfunction1 –resource-group mlnetdemo –settings FUNCTIONS_EXTENSION_VERSION=beta `
Deploy your machine learning model
To get your model up to the server, you will need to get the keys to your storage account. Use the following command in the bash window to get it.
$ az storage account keys list --account-name mlnetdemostorage1 --resource-group mlnetdemo
You’ll see the following:
[
  {
    "keyName": "key1",
    "permissions": "Full",
    "value": "YOURKEY"
  },
  {
    "keyName": "key2",
    "permissions": "Full",
    "value": "NONEYOBUSINESS"
  }
]
Use the following command to create a new directory called models to put your model in using your account key (this can be found in the navigation window under Settings | Access keys).
$ az storage container create --name models --account-key YOURKEY --account-name mlnetdemostorage1
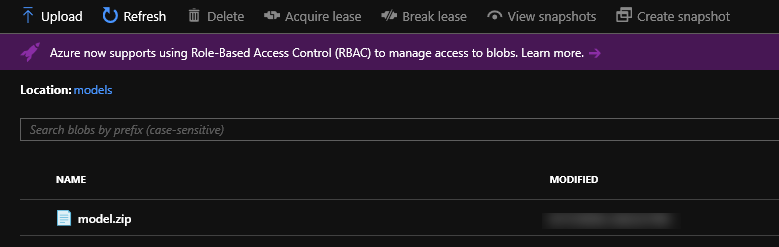
Since we are using Cloud Shell, it will be easier to use the Azure Portal for this step. You can also use the Azure CLI if you wish. Browse to your version of the mlnetdemo resource group and drill down to your storage resource that you created earlier. Drill into the blobs and you see the new folder models subdirectory. Upload the model.zip here which can be found on your hard drive.
In part 2 (coming tomorrow), we’ll look at building an app hosted by your Azure Function that will run images against your iris categorizer.
ATTENTION: If you liked this post and want to suggest future topics of Azure Tips and Tricks then complete this survey.
Want more Azure Tips and Tricks?
If you’d like to learn more Azure Tips and Tricks, then follow me on twitter or stay tuned to this blog! I’d also love to hear your tips and tricks for working in Azure, just leave a comment below.
Leave a Comment