
Azure Tips and Tricks Part 37 - Parse Emails to be used in a Azure Logic Apps
Intro
Most folks aren’t aware of how powerful the Azure platform really is. As I’ve been presenting topics on Azure, I’ve had many people say, “How did you do that?” So I’ll be documenting my tips and tricks for Azure in these posts.
The Complete List of Azure Tips and Tricks
My Scenario - Tracking Run Data
I thought I’d use this week’s Tip and Tricks series to show a practical example of how I am using Azure. I’ve started running outdoors and would like to extract several links that my app generates via email and send them to my OneDrive account automatically vs doing it manually after each run. I’m also concerned that the app that generates my data may be abandoned one day. In order to secure my data, I used a combination of Zappier.com and Azure to solve my problem and over the course of this week, we’ll cover the following sections needed in order to implement this:
- This post - Parse Emails to be used in a Azure Logic Apps
- Create JSON Schema to be used in a Azure Logic Apps
- Setup an HTTP Request Trigger that is used in an Azure Logic Apps
- Upload Files from a URL with Azure Logic Apps
Parse Emails to be used in a Azure Logic Apps
Once a run is complete, the app that I use (Runmeter) generates an email with a link to the run data (GPX, CSV, KML File) in the following format:
Finished Run: Oct 19, 2017 at 8:46:32 PM
Route: New Route
Explorer Link: http://runmeter.com/xxx/Run-20171019-2045
Import Link: http://share.abvio.com/xxx/Runmeter-Run-20171019-2045.kml
Run Time: 1:04
Stopped Time: 0:00
Distance: 0.00 miles
Average: 0:00 /mile
Fastest Pace: 0:00 /mile
Calories: 4
GPX Link: http://share.abvio.com/xxx/Runmeter-Run-20171019-2045.gpx
CSV Link: http://share.abvio.com/xxx/Runmeter-Run-20171019-2045.csv
The pieces of data that we’d like to extract are the kml, gpx, csv URLs and the last piece of the Explorer Link URL. After we have the URLs, then we are going to download them automatically into a OneDrive folder.
I decided to use parser.zappier.com to parse my email data. I did so for a couple of reason:
- It’s free
- The parser engine is a lot better than I can write myself.
- It’s really simple to use
So fire up parser.zappier.com and create a mailbox. You’ll need to send an email to it as it will be your starting template. Once you’ve sent an email, then select the pieces of data that you want to use and give them a name. In the example below, I’ve already selected 4 pieces of data and show how to create a new one.
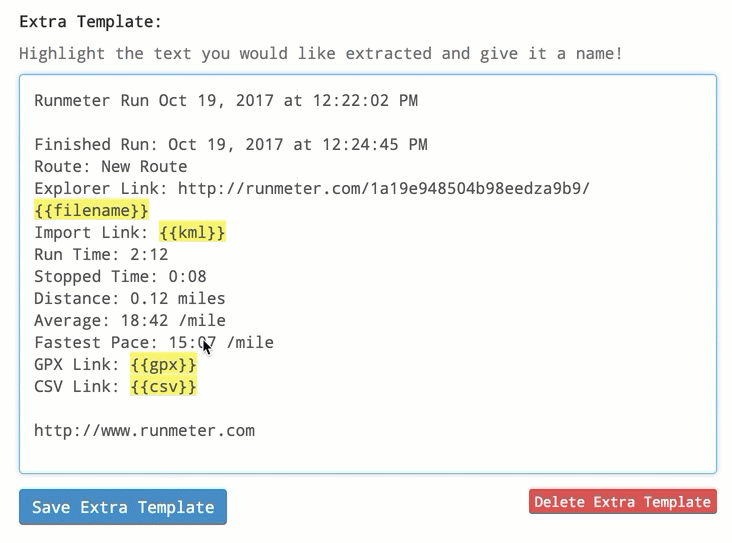
Now that you have your mailbox created and the parser engine knows what data to extract, we can connect the app to The Zappier Editor. But first let’s review the pieces of data that we wanted to extract and why.
- Filename - This is the general filename that the app uses and I think it’s a piece of data we may want to store.
- CSV URL - A URL to the CSV File that we’ll be posting to OneDrive.
- GPX URL - A URL to the GPX File that we’ll be posting to OneDrive.
- KML URL - A URL to the KML File that we’ll be posting to OneDrive.
OK, we’re off to a great start, come back tomorrow as we define a JSON Schema and finish setting up Zappier.
Want more Azure Tips and Tricks?
If you’d like to learn more Azure Tips and Tricks, then follow me on twitter or stay tuned to this blog! I’d also love to hear your tips and tricks for working in Azure, just leave a comment below.
Leave a Comment