
Azure Tips and Tricks Part 24 - Add logic to your Testing in Production sites with PowerShell
Intro
Most folks aren’t aware of how powerful the Azure platform really is. As I’ve been presenting topics on Azure, I’ve had many people say, “How did you do that?” So I’ll be documenting my tips and tricks for Azure in these posts.
The Complete List of Azure Tips and Tricks
Intro
We’ve recently created a web app and uploaded it to Azure App Service. We also took a look at multiple ways to examine those files through the Azure portal interface and how we’d add extensions and deployment slots for our web app. We also took a look at a feature called Testing in Production which allows us to distribute traffic between our production and other slots. In this post, we’ll look at adding additional logic by using PowerShell to automatically distribute the load between your Production and deployment slot sites with the Testing in Production feature.
Install the PowerShell Azure CLI first
Hold up! You’ll want to take a look at the deployment slots and the Testing in Production post to have context on what we’re going to do here.
Go to the Azure CLI Projects page and select select the WebPI Installer or use the PowerShell gallery to bring together the power of Windows PowerShell and Azure.
Once it has been setup, type az from your PowerShell Window to see the shiny new way to interact with Azure.

PowerShell + Azure App Service + Your Web App = Win
Keep in mine that we left off with two versions of our site. One that is production and staging. They are identical except for the staging site has a large font that says jsQuizEngine version 2. We just distributed traffic manually between the two sites by going into the Azure Portal and changing this value from the Testing in Production blade.
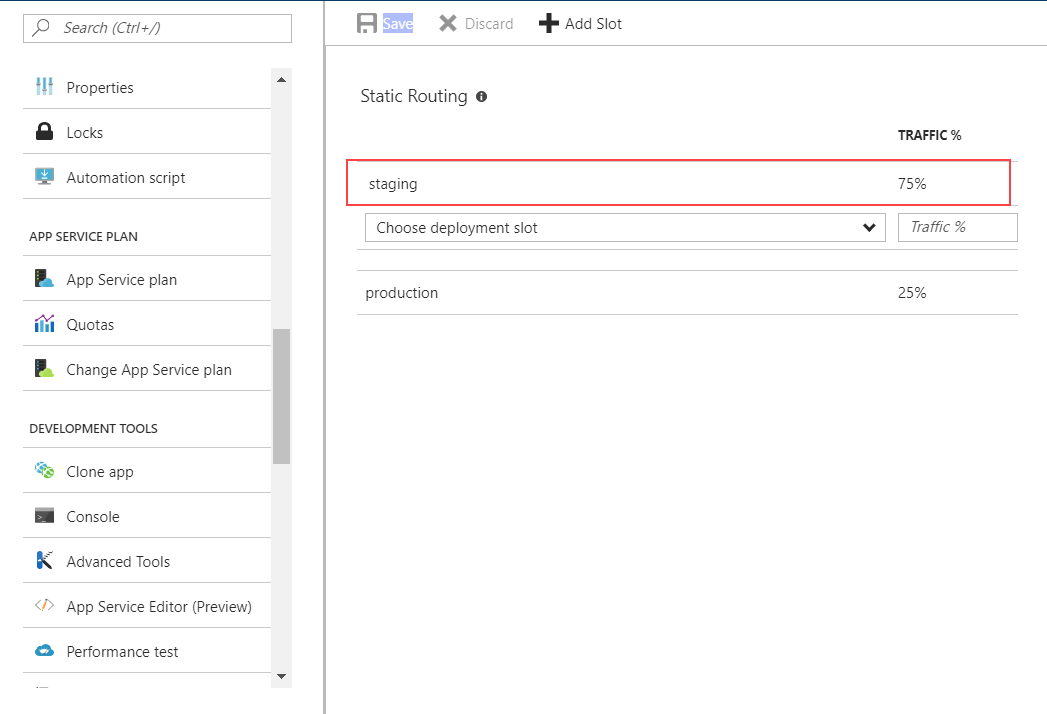
But what if we would like to generate rules to do this automatically where someone doesn’t have to be inside the Portal manually changing this number?
That is where PowerShell and the Azure CLI comes to the rescue. The CLI is great for automation of tasks such as this one. Begin by opening PowerShell and logging in with Add-AzureAccount. It will ask to authenticate you. After authenticated, then set the proper subscription by using Select-AzureSubscription -Default -SubscriptionName "whatsubscriptionnameyouwanttouse". Now run the following script editing only the siteName parameter to match whatever you called your app.
$siteName = "MyQuizApplication"
$rulesList = New-Object -TypeName System.Collections.Generic.List[Microsoft.WindowsAzure.Commands.Utilities.Websites.Services.WebEntities.RampUpRule]
$rule = New-Object -TypeName Microsoft.WindowsAzure.Commands.Utilities.Websites.Services.WebEntities.RampUpRule
$rule.Name = "stage"
$rule.ActionHostName = "$siteName-staging.azurewebsites.net"
$rule.ReroutePercentage = 90
$rulesList.Add($rule)
Set-AzureWebsite -RoutingRules $rulesList -Name $siteName -Slot production
If you open the Azure Portal and navigate to your site page and then Testing in Production then you’ll see the percentage is automatically updated to 90% after the command runs.
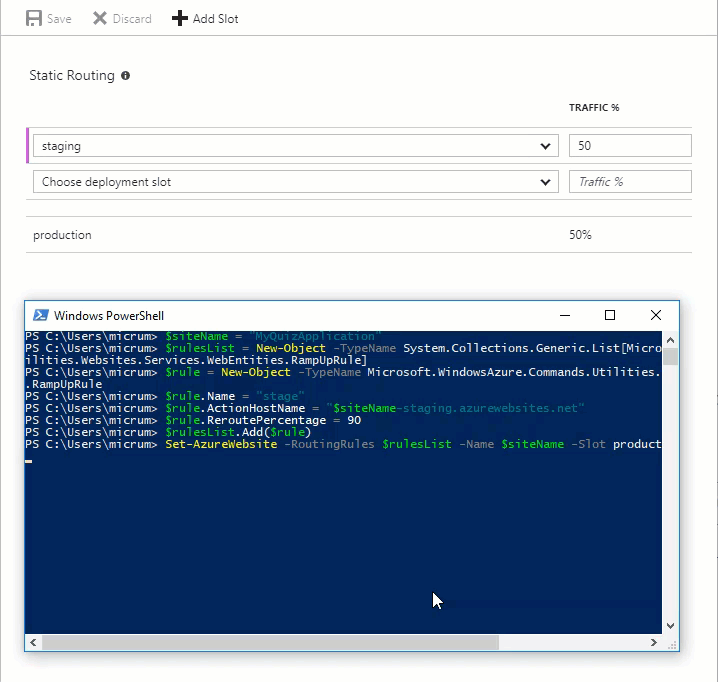
What did the script do again? This script added a rule for our staging environment that set the staging route to a hard coded value of 90%.
If you wanted to scale this number up, for instance, start at 5% for 60 minutes and then increase the value by 5% until the traffic reaches 50% for that slot. You could do so with this script.
$siteName = "MyQuizApplication"
$rule1 = New-Object Microsoft.WindowsAzure.Commands.Utilities.Websites.Services.WebEntities.RampUpRule
$rule1.ActionHostName = "$siteName-staging.azurewebsites.net"
$rule1.ReroutePercentage = 5;
$rule1.Name = "stage"

$rule1.ChangeIntervalInMinutes = 60;
$rule1.ChangeStep = 5;
$rule1.MinReroutePercentage = 5;
$rule1.MaxReroutePercentage = 50;
$rule1.ChangeDecisionCallbackUrl = $null

Set-AzureWebsite $siteName -Slot Production -RoutingRules $rule1
Notice that we only changed 5 lines here to get that functionality.
You can go back to the Testing in Production section and if you refresh your browser every 60 minutes then you’ll see the percentage is automatically updated. Or change the script to refresh every minute to double check it is working.
Want more Azure Tips and Tricks?
If you’d like to learn more Azure Tips and Tricks, then follow me on twitter or stay tuned to this blog! I’d also love to hear your tips and tricks for working in Azure, just leave a comment below.
Leave a Comment