
Azure Tips and Tricks Part 46 - Run an app inside a Container Image with Docker
Intro
Most folks aren’t aware of how powerful the Azure platform really is. As I’ve been presenting topics on Azure, I’ve had many people say, “How did you do that?” So I’ll be documenting my tips and tricks for Azure in these posts.
The Complete List of Azure Tips and Tricks
Containers for the rest of us
For some reason, I find containers are confusing and my goal with my Azure Tips and Tricks is to try to make things easier. In this mini-series, I’ll walk you through Docker and how I use it with Azure. Below is a list of post that you can expect for this week.
- Azure Tips and Tricks Part 45 - Getting Started with Docker and Azure
- Today - Azure Tips and Tricks Part 46 - Run an app inside a Container Image with Docker
- Azure Tips and Tricks Part 47 - Creating a Container Image with Docker
- Azure Tips and Tricks Part 48 - Pushing a Container Image to a Docker Repo
Create an app to run inside a Container Image with Docker
Let’s continue where we left off in our last post, which showed how to get started using Docker. We’re specifically looking at how I use Docker with Azure in these posts.
Begin by opening two tabs instances of either command prompt or terminal. In the right tab, enter the following command to see what docker images are available.
Michaels-MacBook-Pro:~ mbcrump$ docker images
REPOSITORY                   TAG                 IMAGE ID            CREATED             SIZE
microsoft/aspnetcore-build   latest              c0c285a7a306        39 hours ago        1.85GB
Let’s run the following command passing the run parameter, an interactive terminal and naming our app and the image id which the first couple of letters (found with the above command) is good enough.
After this command executes, I’ll be inside my container.
docker run -it --name myapp c0
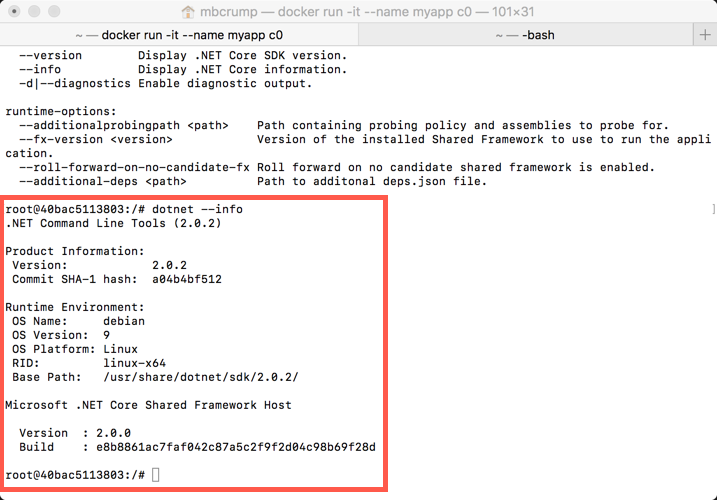
I can validate this by running dotnet --info
root@40bac5113803:/# dotnet --info
.NET Command Line Tools (2.0.2)

Product Information:
 Version:            2.0.2
 Commit SHA-1 hash:  a04b4bf512

...
I know this because I don’t have dotnet core tools installed on my Mac. Very cool! You now have a running container that has the dotnet core tools with just a couple of commands.
We could further validate this by running uname -r or just uname.
root@40bac5113803:/# uname -r
4.9.49-moby
root@40bac5113803:/# uname
Linux
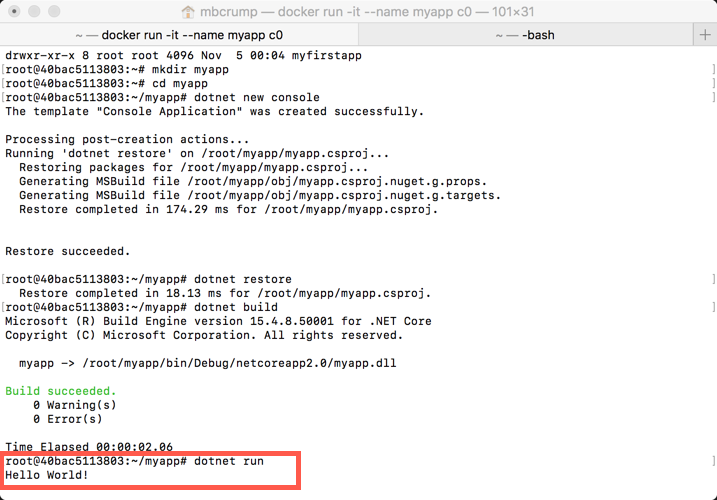
Let’s go ahead and create an app. Run through the following commands to create a new dotnet core console app.
root@40bac5113803:~# mkdir myapp
root@40bac5113803:~# cd myapp
root@40bac5113803:~/myapp# dotnet new console
root@40bac5113803:~/myapp# dotnet restore
root@40bac5113803:~/myapp# dotnet run
Hello World!
Awesome! So now you have a container that is running your .NET Core app. But what can we do with this? How about creating a version of your app that you could give to anyone that is ready to go? We’ll cover that in the next post.
Want more Azure Tips and Tricks?
If you’d like to learn more Azure Tips and Tricks, then follow me on twitter or stay tuned to this blog! I’d also love to hear your tips and tricks for working in Azure, just leave a comment below.
Leave a Comment