
Azure Tips and Tricks Part 137 - Export Azure Resources to CSV files with PowerShell
Intro
Most folks aren’t aware of how powerful the Azure platform really is. As I’ve been presenting topics on Azure, I’ve had many people say, “How did you do that?” So I’ll be documenting my tips and tricks for Azure in these posts.
The Complete List of Azure Tips and Tricks
Export Azure Resources to CSV files with PowerShell
If you’ve ever had a need to create a CSV file of various Azure Resources for reports, etc. than this post is for you. I’m going to quickly show you how to generate a CSV file with PowerShell that lists VMs in the active subscription along with a couple of additional details.
Begin by typing Install-Module -Name AzureRM and follow along with the prompts below. You may also install the update if you wish, but this should work fine in 5.x.
Windows PowerShell
Copyright (C) Microsoft Corporation. All rights reserved.

PS C:\Windows\system32> Install-Module -Name AzureRM

NuGet provider is required to continue
PowerShellGet requires NuGet provider version '2.8.5.201' or newer to interact with NuGet-based repositories. The NuGet
 provider must be available in 'C:\Program Files\PackageManagement\ProviderAssemblies' or
'C:\Users\mbcrump\AppData\Local\PackageManagement\ProviderAssemblies'. You can also install the NuGet provider by
running 'Install-PackageProvider -Name NuGet -MinimumVersion 2.8.5.201 -Force'. Do you want PowerShellGet to install
and import the NuGet provider now?
[Y] Yes  [N] No  [S] Suspend  [?] Help (default is "Y"):

Untrusted repository
You are installing the modules from an untrusted repository. If you trust this repository, change its
InstallationPolicy value by running the Set-PSRepository cmdlet. Are you sure you want to install the modules from
'PSGallery'?
[Y] Yes  [A] Yes to All  [N] No  [L] No to All  [S] Suspend  [?] Help (default is "N"): Y
WARNING: Version '5.7.0' of module 'AzureRM' is already installed at 'C:\Program
Files\WindowsPowerShell\Modules\AzureRM\5.7.0'. To install version '6.3.0', run Install-Module and add the -Force
parameter, this command will install version '6.3.0' in side-by-side with version '5.7.0'.
Run the Import-Module AzureRM command and then type A as shown below:
PS C:\Windows\system32> Import-Module AzureRM

Do you want to run software from this untrusted publisher?
File C:\Program Files\WindowsPowerShell\Modules\AzureRM\5.7.0\AzureRM.psm1 is published by CN=Microsoft Corporation,
O=Microsoft Corporation, L=Redmond, S=Washington, C=US and is not trusted on your system. Only run scripts from trusted
 publishers.
[V] Never run  [D] Do not run  [R] Run once  [A] Always run  [?] Help (default is "D"): A
In case you aren’t in the working subscription where you have your resources then you might have to type Set-AzureRmContext -SubscriptionId <SubId> where SubId is the subscription id that you want to query.
Now add the following in your PowerShell window.
$VMs = Get-AzureRmVM
$vmOutput = $VMs | ForEach-Object {
    [PSCustomObject]@{
        "VM Name" = $_.Name
        "VM Type" = $_.StorageProfile.osDisk.osType
        "VM Profile" = $_.HardwareProfile.VmSize
        "VM OS Disk Size" = $_.StorageProfile.OsDisk.DiskSizeGB
        "VM Data Disk Size" = ($_.StorageProfile.DataDisks.DiskSizeGB) -join ','
    }
}
$vmOutput | export-csv C:\Users\mbcrump\data.csv -delimiter ";" -force -notypeinformation
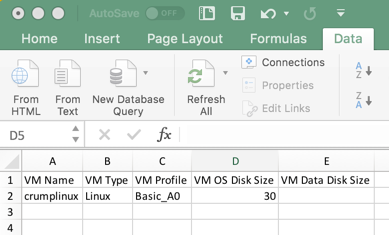
You can now open this CSV file in Excel and use a ; delimeter to format each item into columns.
Great! Now you can go back to other posts that I’ve created such as Quickly display a list of all Azure Web Apps URL from Azure Cloud Shell and simply append the export-csv C:\Users\mbcrump\data.csv -delimiter ";" -force -notypeinformation command.
Want more Azure Tips and Tricks?
If you’d like to learn more Azure Tips and Tricks, then follow me on twitter or stay tuned to this blog! I’d also love to hear your tips and tricks for working in Azure, just leave a comment below.
Leave a Comment