
Azure Tips and Tricks Part 108 - Day 7 - An end to end scenario with Azure App Service, API Apps, SQL, VSTS and CI/CD
Azure Tips and Tricks Videos are NOW Available! : Get all the goodness of Azure Tips and Tricks in video form. Read more about it here
Intro
Most folks aren’t aware of how powerful the Azure platform really is. As I’ve been presenting topics on Azure, I’ve had many people say, “How did you do that?” So I’ll be documenting my tips and tricks for Azure in these posts.
The Complete List of Azure Tips and Tricks
A multi-part series showing an end-to-end possibility
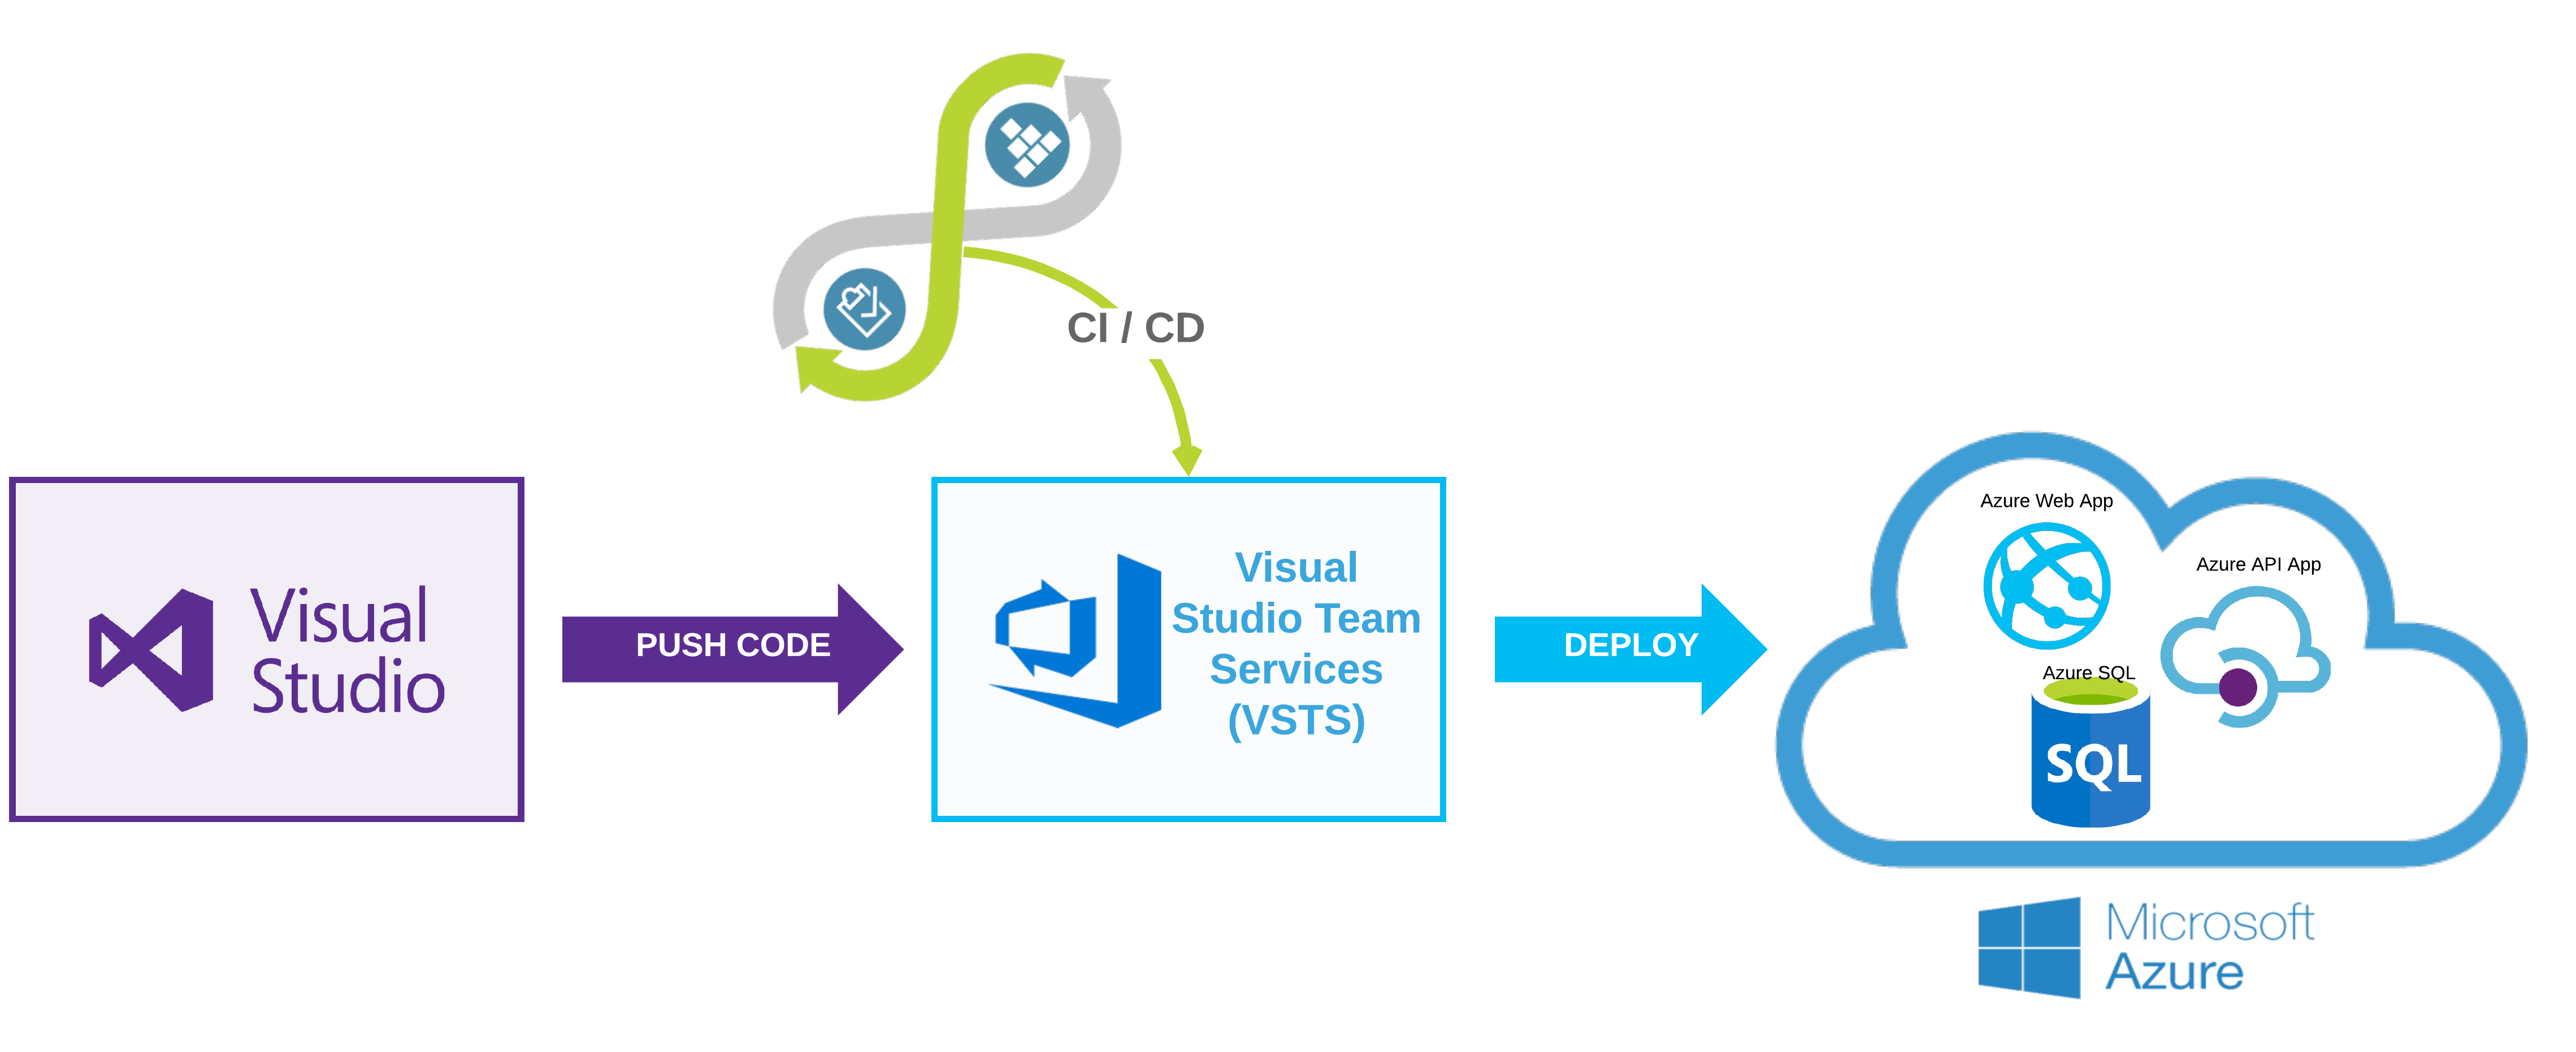
Crystal Tenn and I teamed up to bring an E2E blog series that features an Azure App Service website that communicates with an API project, which communicates to an Azure SQL back-end. The app is a traditional To-Do application based on an existing sample that used ADO.NET, but adapted for Azure deploy and to Visual Studio 2017. The technology/tooling stack is Visual Studio, VSTS, C#, Angular, and SQL.
The process for the app is described below. In Visual Studio, you will start out with a working To Do list application. You will push the code to VSTS (Visual Studio Team Services). Then you will create a CI/CD (Continuous Integration/Continuous Delivery) process in order to deploy to Azure. In Azure you will create 3 resources: Azure Web App, Azure API App, and an Azure SQL Server through this exercise.
- Local Setup - SQL Server - Locally connect a front-end website to an API, and connect the API to a SQL Server.
- Local Setup - Visual Studio and Swagger - Continue Part 1 and use a local instance of Visual Studio and Swagger to communicate to our db.
- Swagger - Learn how to use Swagger for API management
- Azure Deployment - Deploy the SQL database to Azure manually
- Azure Deployment - Deploy the front-end Web App and API App to Azure manually
- Adding the project to VSTS with Git
- VSTS Continuous Integration - Setup a CI Process in VSTS
- VSTS Continuous Deployment - Setup a CD Process in VSTS
- Cleanup - Cleanup and delete the Azure resources created in this tutorial
Keep in mind : While we won’t be going into the deep specifics of how to code, you should be able to use this guide to look at several parts of the Azure technology stack and how you can best implement them in your organization.
Two ways to skin a cat
We have one Visual Studio Solution and 2 web projects that need to be deployed to Azure. We can tackle this in different ways depending on the operation of our team.
-
If we think that one project will be worked on by one team, and another by a different team, we could separate the code into two solutions and upload both to VSTS. We could also keep them in the same solution and have two Build (CI) definitions, one to build the Angular project and one to build the API project. Then we could follow it with two separate Release (CD) definitions so that each part can be separately deployed.
-
Some enterprises will choose to put all pieces of their solution through as a whole, and some places only want to deploy one part at a time. It depends on the complexity of the code, the amount of CI/CD setup you are willing to setup, how the solution(s)/project(s) are divided, and performance requirements (speed/size of CI/CD process).
Note: For the simplicity of this little project and to just teach the basics, I am choosing to group these as one solution that gets built as a whole, then I will have one Release that deploys both parts.
Getting Started
1.) Make sure that you’ve completed the following two steps before moving forward:
- 04a Azure Deployment - Deploy the SQL database to Azure manually
- 04b Azure Deployment - Deploy the front-end Web App and API App to Azure manually
The resources must exist before you can complete the CI/CD steps.
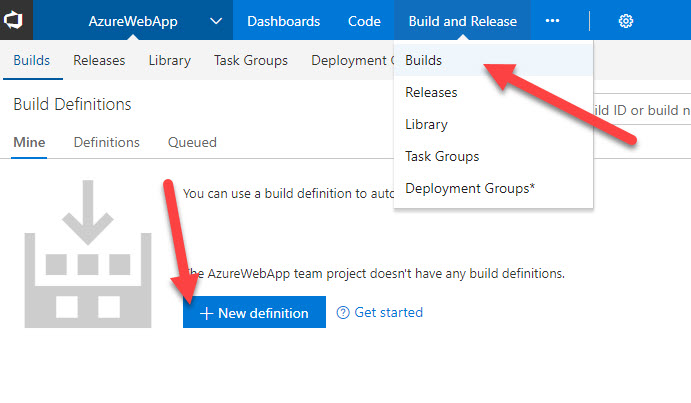
2.) Click on the Build tab then hit New Build Definition.
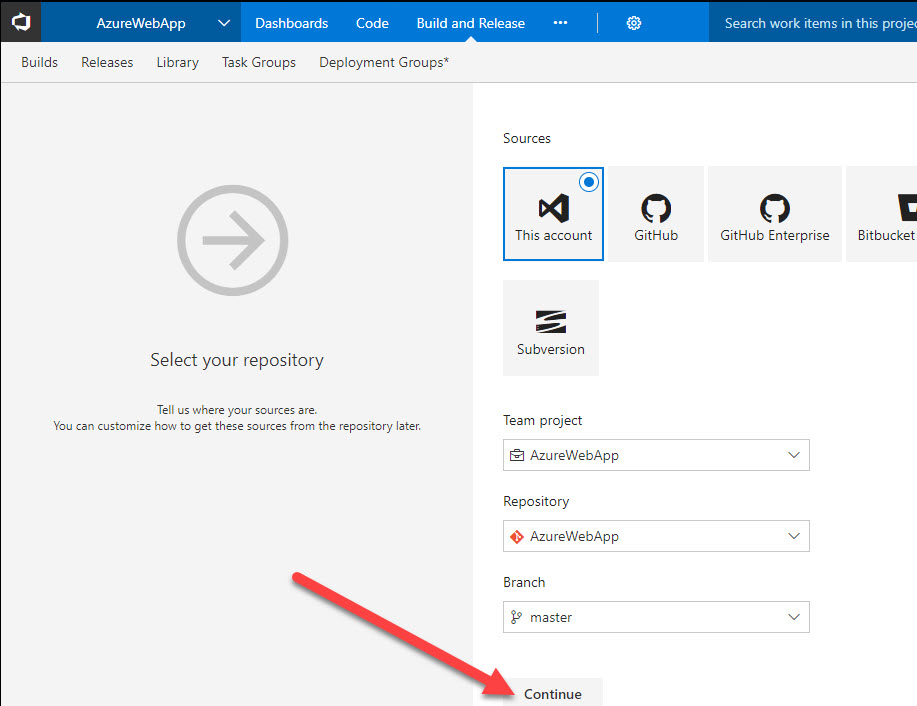
3.) Leave all the defaults and hit Continue.
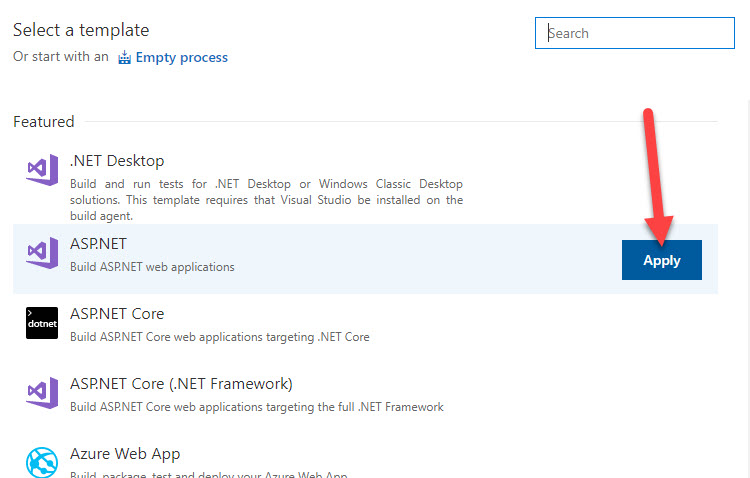
4.) Select the ASP.NET template, mouseover it, and hit Apply.
5.) You should see the following on the left, choose Process first.
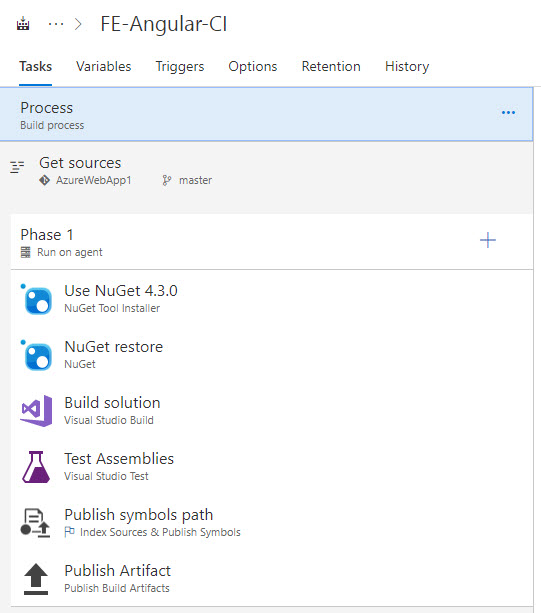
6.) Under process, it will populate a name.

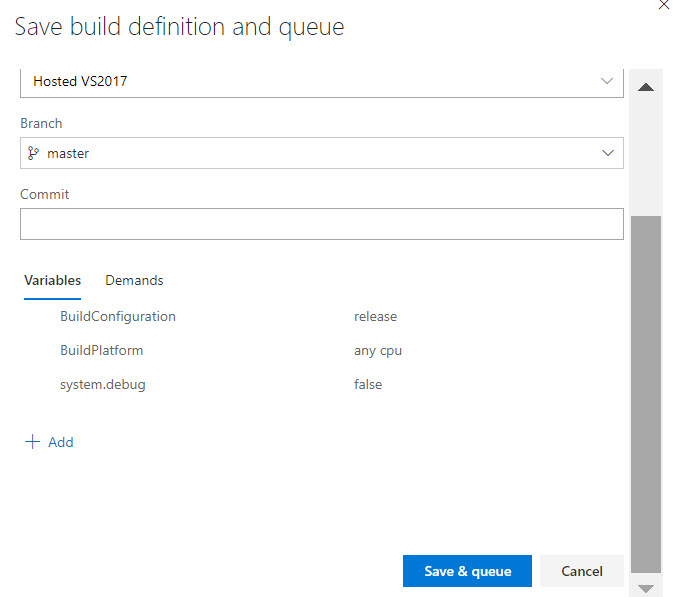
7.) Choose Save & Queue.

8.) A modal will popup, leave the defaults, hit Save & Queue.
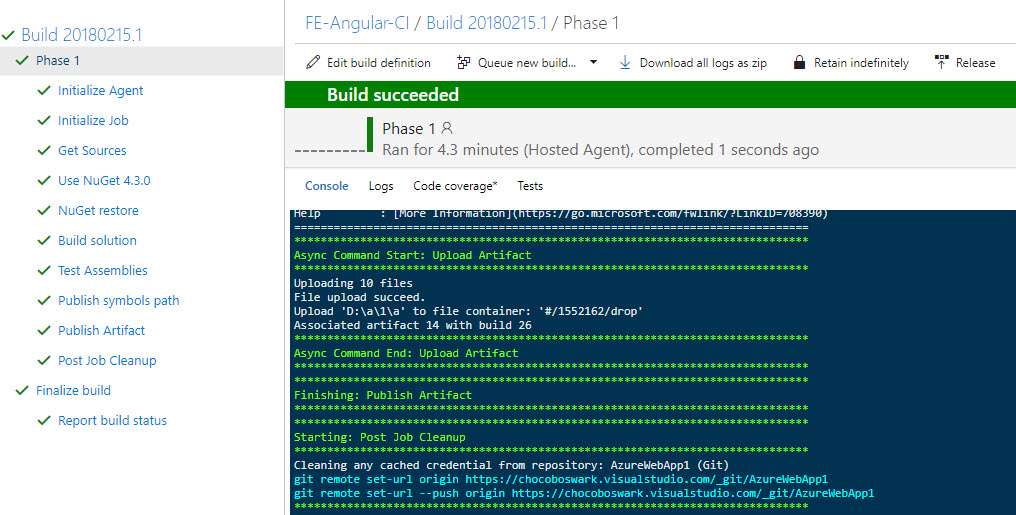
9.) You will see a notification show up with your Build number/name, click on it:

10.) You will be brought to a build screen, wait for it to complete and it will show that the “Build succeeded”.
Come back tomorrow and we’ll look at VSTS Continuous Deployment.
Want more Azure Tips and Tricks?
If you’d like to learn more Azure Tips and Tricks, then follow me on twitter or stay tuned to this blog! I’d also love to hear your tips and tricks for working in Azure, just leave a comment below.
Leave a Comment